


While namespaces are used to control what a process sees when it looks at a system, control groups are about controlling what a process can do at runtime e.g. how much CPU, memory, I/O it can use. cgroup's can also be used to prioritize a process's access to resources, track usage, even freeze, checkpoint, then restart a process.
Like namespaces, control groups can be created and configured, and processes placed in them. Resources are then distributed between the cgroup's processes, using several different schemes.
Control groups are also managed via a pseudo-filesystem, usually mounted at /sys/fs/cgroup. This is actually the only way to manage cgroup's, and the commands described below simply manage files and directories in this pseudo-filesystem.
It should be noted that there are two versions of cgroup's, v1 and v2, and while they can co-exist, v1 is slowly being deprecated, and v2 is becoming the preferred version.
Using cgroup's on RHEL/Centos/Fedora
While there are commands for managing cgroup's e.g.
- cgcreate: create a new cgroup
- cgdelete: delete a cgroup
- cgexec: run a command in one or more cgroup's
- cgset: configure a cgroup (i.e. set its parameters)
- cgget: get a cgroup's configuration
- cgclassify: move an existing process to another cgroup
these are deprecated in RHEL-like systems, in favour of ...drum roll... systemd. The systemd-run command lets you launch a process as a temporary background service, with resource limits e.g.
$ sudo systemd-run -u cgroup-test -p CPUQuota=20% -p MemoryMax=50M /bin/bash
Running as unit: cgroup-test.service; invocation ID: 258c74ae5d0448f5bbc2d41a3bfda1b4
This is convenient, but not so good if you're exploring how this stuff works, so if you're following along at home on such a system, you will need to install the cgroup tools:
$ sudo dnf install libcgroup-tools
An example of restricting memory
We'll start off by writing a small program that allocates memory:
#include <stdio.h>
#include <stdlib.h>
#include <unistd.h>
#include <string.h>
#include <errno.h>
#include <sys/mman.h>

#define BLOCK_SIZE_MB   10
#define BLOCK_SIZE      ( BLOCK_SIZE_MB * 1024*1204 )

int
main()
{
    // FUDGE! We need this to get the OOM Killer to kick in, but
    // we have to run as root for things to work :-/
    int rc = mlockall( MCL_CURRENT | MCL_FUTURE ) ;
    if ( rc != 0 ) {
        printf( "ERROR: mlockall() failed, errno=%d\n", errno ) ;
        return 1 ;
    }

    // allocate memory in a loop
    for ( int i=0 ; i < 20 ; ++i ) {
        printf( "Allocating memory (%d MB)...\n", BLOCK_SIZE_MB ) ;
        void* p = malloc( BLOCK_SIZE ) ;
        if ( p == NULL ) {
            printf( "ERROR: malloc() failed!\n" ) ;
            return 2 ;
        }
        usleep( 500 * 1000 ) ;
    }
    printf( "Completed OK.\n" ) ;

    return 0 ;
}
Compile it:
$ cc -o munch munch.c

$ ls -l
total 20
-rwxr-xr-x. 1 taka taka 12784 Sep 27 01:58 munch
-rw-r--r--. 1 taka taka   883 Sep 27 01:57 munch.c
In a terminal, run top, and press O to filter by process name, using a filter of COMMAND=munch.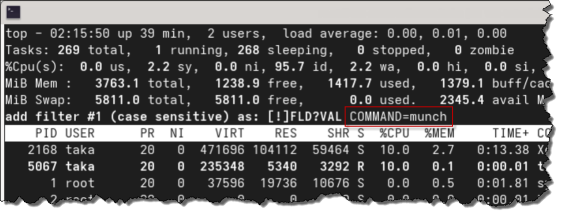
|
In another terminal, run the munch program[1]Unfortunately, we have to run it sudo, explained below., and you will be able to see it allocating memory, and the memory usage being tracked in top.
As you can see, it runs fine, and gets all the memory it asks for, before ending normally. $ sudo ./munch Allocating memory (10 MB)... Allocating memory (10 MB)... ...snip... Allocating memory (10 MB)... Allocating memory (10 MB)... Completed OK. |
Running the test program in a cgroup
We'll run the munch program again, but this time in a cgroup that constrains how much memory it can use.
First, we create a test cgroup:
$ sudo mkdir /sys/fs/cgroup/munch

$ ls /sys/fs/cgroup/munch
cgroup.controllers      cpu.max                          cpu.uclamp.min   memory.events.local  memory.swap.high
cgroup.events           cpu.max.burst                    cpu.weight       memory.high          memory.swap.max
cgroup.freeze           cpu.pressure                     cpu.weight.nice  memory.low           memory.swap.peak
cgroup.kill             cpuset.cpus                      io.bfq.weight    memory.max           memory.zswap.current
cgroup.max.depth        cpuset.cpus.effective            io.latency       memory.min           memory.zswap.max
cgroup.max.descendants  cpuset.cpus.exclusive            io.max           memory.numa_stat     memory.zswap.writeback
cgroup.pressure         cpuset.cpus.exclusive.effective  io.pressure      memory.oom.group     pids.current
cgroup.procs            cpuset.cpus.partition            io.prio.class    memory.peak          pids.events
cgroup.stat             cpuset.mems                      io.stat          memory.pressure      pids.events.local
cgroup.subtree_control  cpuset.mems.effective            io.weight        memory.reclaim       pids.max
cgroup.threads          cpu.stat                         irq.pressure     memory.stat          pids.peak
cgroup.type             cpu.stat.local                   memory.current   memory.swap.current
cpu.idle                cpu.uclamp.max                   memory.events    memory.swap.events
Note that Linux has automatically created a bunch of stuff in our new "directory".
We configure the maximum amount of memory that processes in this cgroup can use:
$ cat /sys/fs/cgroup/munch/memory.max
max

$ sudo vi /sys/fs/cgroup/munch/memory.max   ← change "max" to be "50M"

$ cat /sys/fs/cgroup/munch/memory.max
52428800
Again, Linux has accepted our change of 50M, but when asked to report what the value is, returns the actual number.
The PID's of processes that are in a cgroup are recorded in the cgroup.procs file, so in another terminal, let's monitor that file:
$ watch -n 1 cat /sys/fs/cgroup/munch/cgroup.procs |
Now, we run the test program again, but inside our test cgroup, using the memory controller.
You should see the PID to the munch process appear in the cgroup.procs file[2]That we're watching in the other window., until it gets terminated by the OOM Killer, for using too much memory. $ sudo cgexec -g memory:munch ./munch Allocating memory (10 MB)... Allocating memory (10 MB)... Allocating memory (10 MB)... Allocating memory (10 MB)... Allocating memory (10 MB)... Killed |
Finally, let's clean up the cgroup we created:
$ sudo cgdelete memory:munch
If you still have watch running in the other terminal, you will see it suddenly show a "no such file or directory" error, since the pseudo-directory in /sys/fs/cgroup/ will have been removed.
Why did we have to run the munch program as root?
Linux allows memory to be over-committed i.e. requests for memory will succeed, even if there's not enough, and things will only fail when the memory is actually used.
Setting vm.overcommit_memory to 2 appears to be a system global setting that controls the total amount of memory that can be committed, not per-process, and the only way I could get this to work was by using mlockall(), which, unfortunately, needs root to work.


 I am a
