


We now have three VM's that will operate as our Kubernetes cluster, one for the control plane (vm-kcontrol), and two for the worker nodes (vm-knode1 and vm-knode2).
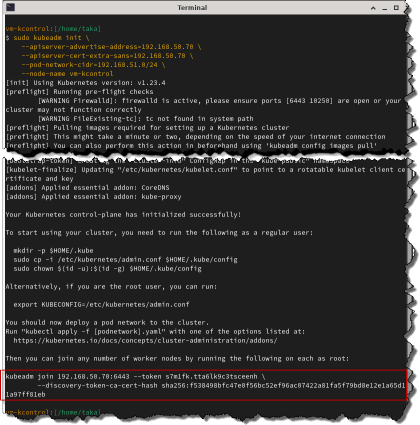
Set up the control planeSSH into vm-kcontrol and initialize it as a control plane:
sudo kubeadm init \
    --apiserver-advertise-address=192.168.50.70 \
    --apiserver-cert-extra-sans=192.168.50.70 \
    --pod-network-cidr=192.168.51.0/24 \
    --node-name vm-kcontrol
Note that we need to specify a network CIDR that the pods will use to talk to each other. This, of course, must not be used by anything else on your network, otherwise strange things will surely happen Set up the worker nodesAt the end of the kubeadm init output[1]If you missed it, you can get it again by running: kubeadm token create --print-join-command., there will be a command that you need to run on each worker node (in our case, vm-knode1 and vm-knode2), to join the cluster e.g.
ssh knode1
sudo kubeadm join 192.168.50.70:6443 --token ... \
    --discovery-token-ca-cert-hash sha256:...
|
|

Set up networking
We also need to install a pod network add-on, so that the pods can talk to each other.
Calico is one of the more popular ones, and can be installed like this:
kubectl apply -f https://docs.projectcalico.org/manifests/calico.yaml
Note that the Calico documentation says that firewalld, or any other iptables manager, should be disabled (!), but this is what (I think[2]It took a lot of stuffing around to figure out, but this is what I did to get DNS working inside the pods.) needs to be done to get Calico working with firewalld.
On every machine in the cluster, open up the firewall for Calico's BGP and IP-in-IP traffic:
sudo firewall-cmd --add-port 179/tcp --permanent
sudo firewall-cmd --add-rich-rule='rule protocol value="4" accept' --permanent
Calico creates an interface called tunl0 for pods to communicate with each other, so we also want to allow that traffic:
sudo firewall-cmd --zone=trusted --add-interface=tunl0 --permanent
We want to stop NetworkManager from managing Calico's interfaces, by creating a file called /etc/NetworkManager/conf.d/calico.conf that looks like this:
[keyfile]
unmanaged-devices=interface-name:cali*;interface-name:tunl*;interface-name:vxlan.calico;interface-name:wireguard.cali
Finally, we want to allow forwarding, and DNS traffic:
sudo firewall-cmd --add-forward --permanent
sudo firewall-cmd --add-service dns --permanent
Reboot the server (and repeat these steps for each machine in the cluster).
Manage the cluster
Get the file /etc/kubernetes/admin.conf from the vm-kcontrol server, and on every machine you want to manage the cluster from, save it as ~/.kube/config[3]You may also need to chown this file, so that it can be read by a non-root user..
You should now be able to use kubectl to query the cluster e.g.
kubectl get nodes
kubectl get pods -n kube-system
 Kubernetes is managed from the command-line, but if you like a GUI, Octant is a simple browser-based interface that lets you explore the cluster.
Test the cluster
To test things, we'll deploy instances of nginx as a daemon set, which means that Kubernetes will ensure that a pod will be running on each node (even as they come and go).
Create the daemon set like this:
cat <<EOF | kubectl apply -f -
    apiVersion: apps/v1
    kind: DaemonSet
    metadata:
      labels:
        app: nginx
      name: nginx
    spec:
      selector:
        matchLabels:
          app: nginx
      template:
        metadata:
          labels:
            app: nginx
        spec:
          containers:
          - image: nginx
            name: nginx
EOF
There will be a short delay as Kubernetes downloads the container image and runs the pods; you can monitor changes in the status like this:
kubectl get pods -w
 Once the pods have come up, run kubectl get pods to get the names Kubernetes has assigned to the pods, and run kubectl describe pod to get detailed information about them.
In this case, the selected pod is running on vm-knode2, and has been assigned an IP address of 192.168.51.199[4]Note that this address lies within the 192.168.51.0/24 CIDR we specified when we initialized the control plane..
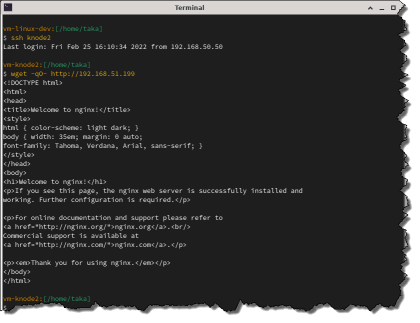 SSH to the node the pod is running on, and wget nginx's welcome page by connecting to the pod's IP address.
These assigned IP addresses will only work on the machine the pod is running on, so to make the pods accessible from outside the cluster, we need to create a service that exposes a port to the outside world, and sends traffic from that to one of the pods inside the cluster:
cat <<EOF | kubectl apply -f -
    apiVersion: v1
    kind: Service
    metadata:
      name: nginx
    spec:
      type: NodePort
      selector:
        app: nginx
      ports:
      - protocol: TCP
        port: 80
        nodePort: 30080
EOF
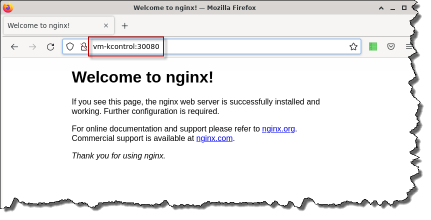 You should now be able to open a browser and open port 30080 on any of the VM's, and see nginx's welcome page.
References
| ↵1 | If you missed it, you can get it again by running: kubeadm token create --print-join-command. |
|---|---|
| ↵2 | It took a lot of stuffing around to figure out, but this is what I did to get DNS working inside the pods. |
| ↵3 | You may also need to chown this file, so that it can be read by a non-root user. |
| ↵4 | Note that this address lies within the 192.168.51.0/24 CIDR we specified when we initialized the control plane. |


 I am a
